Seen These Pretty Ice Lights Around Minnesota? Here’s How to Make Them
The twinkling lights have begun coming down or at least some of the decorations that scream Christmas. We are in the New Year and there are arguments all over on when the appropriate time to take down the tree, decorations and lights. But there isn't really a right answer, it's a matter of opinion, right?

I for one, don't need to see the giant displays with Santa and all things Christmas, but have no problem seeing pretty lights at night while driving along neighborhoods. Seeing the illumination in the winter, can be quite pretty against the snow and we have plenty of that to use as a background.
But how would you like to do something a little more unique for the rest of the winter, that won't take much effort and leave many asking how did you do that? That's exactly what many asked John Kaufman recently on Facebook in the Quirky Minnesota Places Group when he shared pictures of these really pretty winter lights he made and has lining the walkway at his home.

Instinctively after I saw them, I wondered if it would be difficult to make these and I saw my answer almost right away in the post when John answered someone else, saying,
These are super easy simple to do. Just fill some balloons with water, freeze, and take the balloons off. So many versions of these you can do.
Sounds easy enough! But I still wondered...how do you get them hollow to put candles in them? If you are wondering like I am, I did a little more research to give you a better "recipe" on how to make these pretty luminaries yourself at home. There were a few different ideas, but what you need is about the same across the board.
Main Ingredients:
- Balloons
- Water
- Freezer or Minnesota Outdoor Winter Weather
- Lights/Candles
1st Step:
Get whatever size balloons you want and fill them with water from the tap. Bigger size will be good for outdoors with the snow, because they could sink a bit into it.

2nd Step:
Put the water balloons in the freezer or during a Minnesota winter, outside where they can freeze. Size of the balloon will determine how long it takes to freeze, the bigger the balloon the longer it will take.
Also determining how long you let it freeze is if you want it solid or hollow. If solid, then throw it in for at least 12 hours to a day on top of a rock. Basically freeze it and forget it for a bit. If you want it hollow, check on it after about 4 hours and determine if you want to freeze it longer or not.
3rd Step:
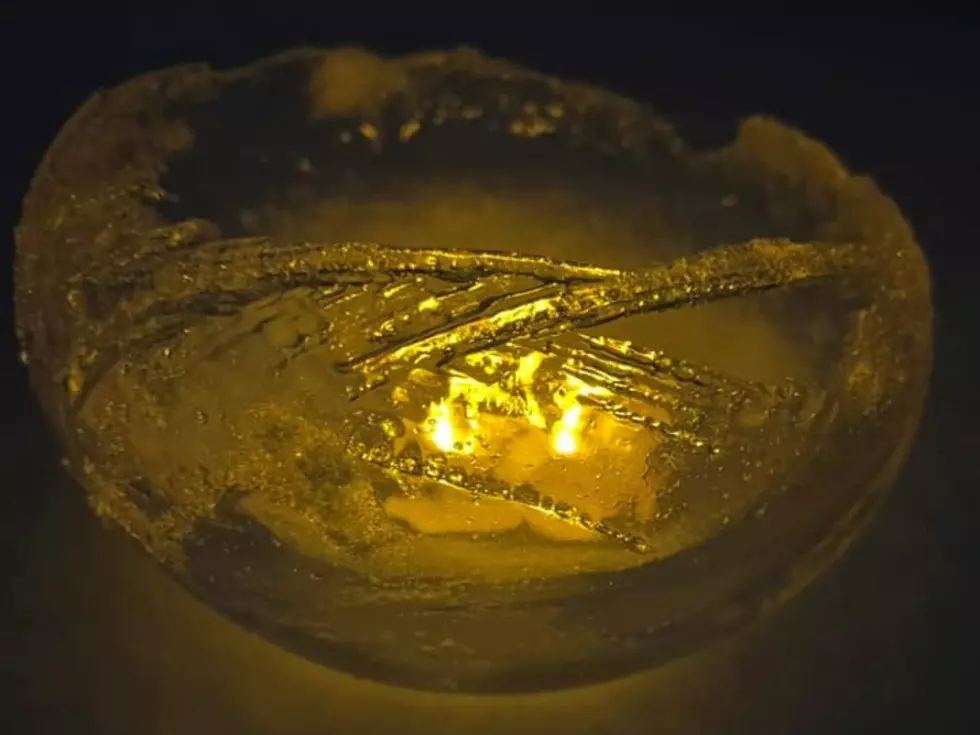
If you let it freeze solid over the rock, cut the balloon off and either place a tea light candle where the indentation left from the rock is, or if you have battery powered tea lights, place them on the snow and place the ice lantern over it and place where you'd like outside in your yard.
If you decided to not freeze it fully, make sure there is a layer of ice with water still inside. Take the balloon off the mold and pour out the water. From there, again place the tea light real or battery powered in the lantern and place where you'd like around your yard.

Last Step:
Impress your neighbors and friends like John K. did!
Really there are SEVERAL ways you can be making ice lanterns, this just so happened to be what I was looking at for easy ideas and ran with it. Experiment and have fun with it because it's really hard to mess it up and no two are exactly the same.
If you try this fun winter light project I'd love to see pics. Shoot us a message and a pic via our app so I can be in awe of the beauty!
LOOK: Here are 25 ways you could start saving money today
Gallery Credit: Bethany Adams
Sauk Centre Has the Coolest Benches You Will Ever Sit On
27 Things All Minnesotan's Have in Their Junk Drawer
More From Mix 94.9